Sunday, January 19, 2014

How to Allow Domain User to " Log On Locally " Right on Domain Controller

Domain user restricted to Log  On Locally on Domain Controller By Default . If you want  to allow  Domain user Log On  locally on domain Controller then you have to make the member of Log On locally group .

Follow these steps to allow Log on Locally right to domain user............
1.  Click on Start button , then type gpmc.msc and press Enter .


2. On the Group Policy management windows , Navigate Forest , then navigate Domain , then navigate Domain name ( Comnetworks.com ) , then Right-Click on Default Domain Policy and then Click on Edit


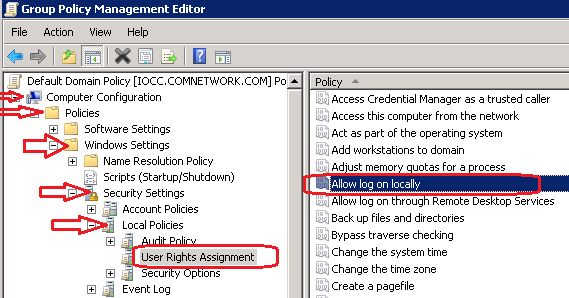
3.  Now Group policy Management Editor window , Navigate Computer Configuration , Policies , Windows setting , Security Setting , Local Policies then Click on User Right Assignment and then in the Right pane Double-click on Allow Log on locally .


4.  Click on Define these policy setting Check box  then Add user or Group and then Click on Browse .


5 . Click on Advanced .


6. Click on Find Now , then Click Select User which you want to allow ( Rakesh Kumar ) . the Click on Ok , OK and then Apply and Ok .

How to Change Log On Screen Background Image on Windows 7

You can change Log On background screen image in windows 7 and you can change your Own Image as a Log On background Screen . Your Custom Image must be less then 256 KB . this is the easiest way to change your Log on Background Scree in Windows 7 .

                                                   Default Background Image 


Follow these Steps to Change Log On  Screen Background image..........

1. First you will have  to Download to Windows changer background software  . Source from http://www.julien-manici.com  .


2. After complete Download , Extract and Double-click on Win7Logon8Backgroundchanger.exe file to run Setup .


3.  On the Background changer windows , Click on choose a Folder ,  Select Folder which have Image
    then Click on Ok .


3. Select Image which you want to apply  and then Click on Apply . Then click on Yes  .


Now your Log On Screen Background Image has been Changed , Now Log Off System to go Log On Screen and then see change . Like below figure .


How to Create Virtual Machine in Windows 7

You can Create Virtual Machine inside Windows 7 with the of Microsoft Virtual PC tool . you can Run Multiple Operation system on a Single hardware Machine .This is very useful tools for Learners on a single computer. you can test your networking training with the help of this tool .

Follows these steps to Create Virtual Machine......................


1. First You have to Download Microsoft Virtual PC Tool from Microsoft Website .


2. Now Click on Continue and again Continue and then run Genuine check and then Copy code .


3. Now Past Code Genuine windows Validation and the Click on Validate and then Click on Download .


4. Now Choose Download Option Windows 7 32 Bit or Windows 7 64 Bit , Select Which version you have Installed .

5. After Downloading ,  Run Downloaded File and Click on Yes, then After Installation complete Restart Computer .


Create Virtual Machine

6. Click on Start button and then Click on Windows Virtual PC .


7. Now Click  On Create Virtual Machine on New Window .


8. Now Type Virtual PC name (Com-networks) and then Browse location where you want to store Virtual PC File and then Click on Next .


9 . Now Assign memory Space to the new Virtual machine then Click on Next .


10. Now Select Create a Dynamically expanding Virtual hard disk option to Install  Virtual Machine , Now verify the name and Location, and then Click on Create .


Now Virtual Machine Has been Created 

11. Now Right-click on Virtual machine Icon then Click on Open .


12. Now it Will showing Disk Boot Failure and You have to Install Operating System .


13 . Now Click on Tools Menu and then Click on Setting .


14. Now Click on DVD drive in Setting Option select on the right pane Select Source to Install Operation System and then Click on Ok. 


Now Installation is going on ...............................

How to Install and Run Android OS on your PC

Run Android on PCAndroid is Running on Mobile phone , teblet . Its a best apps for mobile phone and now you can Install and Run Android OS on your PC , Its a open Source Application to use on Mobile and your PC . You can Boot your computer Directely on with on Android OS with the help of  Pendrive or Memory card .

Follows these steps to Install and Run Android on Your PC


1. First You have to Download Android-x86 on your PC .

2. Now You have to Download UnetBootin on your PC . Now choose Operating System on which you have to Download .


3. Now Insert Your USB Flash Drive or Memory Card on PC .

4. Now Run Downloaded UNetBootin , then go to DiskImage option then Browse for Android Downloaded ISO file .


5. Now on the Type option Select USB Drive and then Select Flash Drive Letter D:\ , and then Click on OK .


6. Now Android is getting Install on Flash Drive which you have Inserted . After Complete installation Click on Reboot Now .


7. Now Press F9 at the time of Reboot and Select on First Boot device option Boot From USB Flash Drive .

8. After Booting with USB Flash drive Select Live CD- Run Android without Installation .


Now you have succesfully Install Android OS on your PC

How to Create a Batch file to Open Multiple Program at once in Windows

Suppose you are working in a office then you will have to use multiple program at once such as Calculator , MS excel , and Google chrome to complete your task . you can open these application with a single click on batch file shortcut . this is very useful feature in windows to save time . 

Follow these steps to create batch file to Open multiple application.........
1.  Click on Start button , then Type in search box  Notepad then press Enter .


2. Now in the Notepad text area type Start Command and then Excutable file name of Application which you want to Open  .  

Echo off
Start calc.exe
Start chrome.exe
Start excel.exe
exit


3. Now Click on File and then Click on save .


4.  On the Save as Windows Click on Desktop , then Give the file name as Filename.bat and then Click on Save .


Now Batch file has been Created to Open Multiple program at once on Single click. when you will  double-click on Comnetworks batch file then Calculator, MS Excel and Google chrome will be open 

How to Create System Image Backup In Windows 7

You can create Clone of your System Image in Windows 7. suppose your system going to crash then you can create system image backup on Another Hard Drive , DVD and Network Location . This is very useful feature in windows 7 .


Follow these steps to create System Image in Windows 7
1. Click on Start button , then type in Search box Backup and Restore and then Click on Backup and restore .


2.  Now Backup and Restore window, Click on Create a System image .


3 .  Now you have to Select location where you want to save Image . you can take backup on External  Hard disk , Multiple DVD or Network Location  . then Click on Next .


4. Now Select Drive which you would like to take Backup with select check Box and click on Next .


5.  On Confirmation Windows Click on Start Backup to Start backup .


6.  Now backup Process going on , after complete successfully backup close Backup and Restore Backup Windows .

How to Uninstall Program using Command Prompt in Windows 7

In windows you can Uninstall an application using command prompt . its is also easy way to Uninstall any program . Sometime program does not Remove properly through Add/Remove program then you can remove using Command Prompt .
 
Follow these steps to Remove program using command Prompt .

1. Click on Start button then Type in search box CMD , and then Press Enter .


2. Now on the Command prompt windows , type wmic and then press Enter .


3. Now type Product get name and then press Enter . it will Generate list of Installed Program . 


4.  Now Type below command and Give exact name of program which you want to remove .
 
      Product where name="Program name" call uninstall .
     and then press Enter .


5. Now press Y to Confirm Uninstallation  and then Press Enter .


6.  Now Program has been successfully uninstalled, Close Command prompt windows .